티스토리 뷰
배경
나에겐 익숙한 RestAssured가 팀원들에게는 익숙하지 않아 러닝커브가 올 수 있을 것 같았다.
따라서 RestAssured에 대해서 빠르게 이해하고 쉽게 적용할 수 있도록 이 글을 작성하게 되었다.
이어질 코드 설명은 다음 설정을 기준으로 한다.
- Spring Boot 3.4
- Java 17
- Kotling Spring 2.0.10
- Rest assured 5.5.0
- JUnit5 + AssertJ
RestAssured가 뭐야?
간단하게 RestAssured가 무엇인지, 왜 탄생하게 되었는지 배경에 대해 알고 가면 좋을 것 같다.
Testing and validating REST services in Java is harder than in dynamic languages such as Ruby and Groovy. REST Assured brings the simplicity of using these languages into the Java domain. (ref)
공식 문서에서는 RestAsssured는 REST 서비스를 간단하게 테스트할 수 있게 도와주는 서비스라고 나와있다.
REST 요청은 대부분 아래와 같은 JSON 요청이 오게 된다.
{
   "lotto":{
      "lottoId":5,
      "winning-numbers":[2,45,34,23,7,5,3],
      "winners":[
         {
            "winnerId":23,
            "numbers":[2,45,34,23,3,5]
         },
         {
            "winnerId":54,
            "numbers":[52,3,12,11,18,22]
         }
      ]
   }
}
이러한 요청을 RestAssusred를 활용한다면 다음과 같이 간단하게 테스트할 수 있다.
@Test public void lotto_resource_returns_200_with_expected_id_and_winners() {

    when().
            get("/lotto/{id}", 5).
    then().
            statusCode(200).
            body("lotto.lottoId", equalTo(5),
                 "lotto.winners.winnerId", hasItems(23, 54));

}
보다시피 매우 간단하게 테스트를 작성하여 API를 테스트할 수 있다.
특징
- given-when-then 패턴으로 가독성이 좋다.
- 응답된 JSON, XML를 손쉽게 검증할 수 있다.
- 블랙박스 테스트로 오로지 Request(요청)와 Response(응답)로 결과를 확인한다.
활용
기본적으로 given-when-then 패턴으로 코드를 작성하면 된다.
예시를 들어서 설명하는 게 이해가 빠를 것 같아서 바로 예시로 설명하겠다.
기본 예제
[요청]
유저가 존재하는지에 대한 조회 API가 온다고 해보자.
- GET http://localhost:51396/api/auth/check
Request Header
|
Name
|
Type
|
M/O
|
Description
|
Default
|
|
Authorization
|
Bearer
|
M
|
로그인 플랫폼 액세스 토큰
|
|
Request Parameter
|
Name
|
Type
|
M/O
|
Description
|
Default
|
|
provider
|
Number
|
M
|
로그인 플랫폼(ex. 0 = 카카오)
|
|
Request method:	GET
Request URI:	http://localhost:51396/api/auth/check?provider=0
Headers:		Authorization=Bearer thisistoken
body: <none>
[응답]
이에 대한 응답으로 우리는 다음을 기대한다.
200 OK
{
    "responseCode": "SUCCESS",
    "result": {
        "exists": false
    }
}
[테스트 예제]
이에 대한 기본적인 테스트를 작성해 보면 다음과 같다.
import io.restassured.RestAssured
import org.hamcrest.Matchers.equalTo

@Test
fun `존재하는 유저`() {
    RestAssured
        .given()
            .header("Authorization", "Bearer thisistoken")
            .param("provider", 0)
        .`when`()
            .get("/api/auth/check")
        .then()
            .body("result.exists", equalTo(false))
}- given(): 주어질 값을 정의하는 부분이다.
- when(): 요청값을 설정한다.
- then(): 응답값을 검증하는 부분이다.
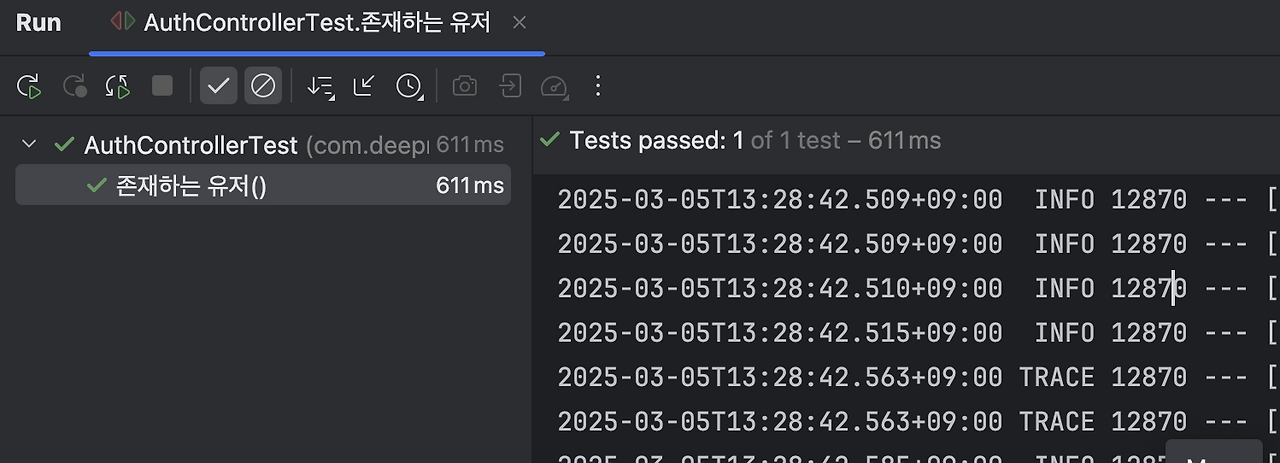
그러면 위와 같이 테스트가 정상적으로 성공하는 것을 확인할 수 있다.
참고로 들여쓰기를 나눠두면 가독성에 좋지만 나는 통일하는 편이다.
또한 위 예제에서는 equalTo를 활용해서 테스트했지만 나는 응답 값을 객체로 매핑해서 Asseritons.assertThat으로 테스트한다.
반 필수적인 옵션
[요청에 Body 담아서 보내기]
요청 Body에 객체를 담아서 보내면 해당 객체가 자동으로 JSON으로 바꿔져 요청이 보내지게 된다.
 val signUpRequest =
        SignUpRequest(
            0,
            "경기도 화성시 동탄순환대로26길 21",
            37.207581,
            127.113558,
            true,
            true,
            setOf(1, 10, 15)
        )

// when & then
RestAssured.given().log().all()
        .header("Content-Type", "application/json")
        .header("Authorization", "Bearer $providerAccessToken")
        .body(signUpRequest)
        .`when`().post("/api/auth/sign-up")
        .then().log().all()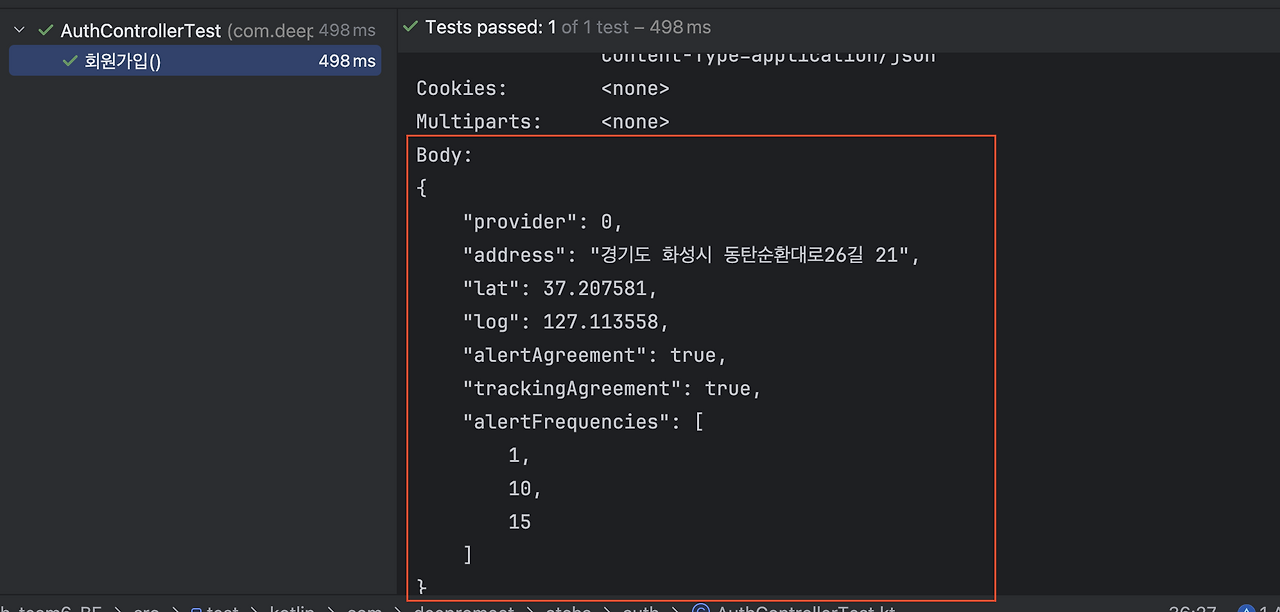
[응답 Body를 객체로 변환]
extract() 와 as 를 활용하면 응답 Body를 원하는 객체로 매핑할 수 있다.
val response =
      RestAssured.given().log().all()
          .header("Content-Type", "application/json")
          .header("Authorization", "Bearer $providerAccessToken")
          .body(signUpRequest)
          .`when`().post("/api/auth/sign-up")
          .then().log().all()
          .extract().`as`(ApiResponse::class.java)
as 안에 매핑할 객체의 class를 넣어주면 된다.
위 response를 출력해보면 아래와 같다.
ApiResponse(responseCode=SUCCESS, timeStamp=null, path=null, message=null, result={id=1, accessToken=eyJhbGciOiJIUzI1NiJ9.eyJzdWIiOiIxIiwiaWF0IjoxNzQxMTQ5OTM4LCJqdGkiOiIxNjFkMzk5Zi01ODdjLTRhZjQtYjgwMC00NzA4MTBiZWFmMzgiLCJleHAiOjE3NDExNTE3Mzh9.DYncei33REo4Qtj7YII3ma5ypEy087IgpmZSyJ0KgL0, refreshToken=eyJhbGciOiJIUzI1NiJ9.eyJzdWIiOiIxIiwiaWF0IjoxNzQxMTQ5OTM4LCJBQ0NFU1MiOiJleUpoYkdjaU9pSklVekkxTmlKOS5leUp6ZFdJaU9pSXhJaXdpYVdGMElqb3hOelF4TVRRNU9UTTRMQ0pxZEdraU9pSXhOakZrTXprNVppMDFPRGRqTFRSaFpqUXRZamd3TUMwME56QTRNVEJpWldGbU16Z2lMQ0psZUhBaU9qRTNOREV4TlRFM016aDkuRFluY2VpMzNSRW80UXRqN1lJSTNtYTV5cEV5MDg3SWdwbVpTeUowS2dMMCIsImp0aSI6ImQ1NGZlNGVhLWQ0NzktNGMyOC1iMjAyLTA1YjlmMzJiYjcxOCIsImV4cCI6MTc0Mzc0MTkzOH0.Qo5-nu_FVhnAkXNg8sxgW2Py8NPYnFVW2wS138kBOO8})나는 ApiResponse에서 result를 또 다른 객체인 SignUpResponse 로 매핑할 것이다. 그러려면 다음과 같은 추가 작업을 해줘야 한다.
val result = RestAssured.given().log().all()
          .header("Content-Type", "application/json")
          .header("Authorization", "Bearer $providerAccessToken")
          .body(signUpRequest)
          .`when`().post("/api/auth/sign-up")
          .then().log().all()
          .extract().`as`(ApiResponse::class.java)
          .result
val objectMapper = jacksonObjectMapper()
val signUpResponse = objectMapper.convertValue(result, SignUpResponse::class.java)
조금 복잡해졌지만 ObjectMapper를 활용하여 ApiResponse.result를 SignUpResponse 객체로 매핑했다.
(더 간단하게 할 수 있는 방법을 알게 되면 수정하겠다.)
Assertions.assertThat(signUpResponse.id).isNotNull()
Assertions.assertThat(signUpResponse.nickname).isNotNull()
매핑된 객체는 위와 같이 Assertions로 테스트하면 된다.
[응답 코드 확인]
statusCode을 then에 추가하면 응답 코드가 일치하는지도 확인할 수 있다.
따라서 이것도 추가하는 것을 추천한다.
import io.restassured.RestAssured
import org.hamcrest.Matchers.equalTo

@Test
fun `존재하는 유저`() {
    RestAssured
        .given()
        .header("Authorization", "Bearer thisistoken")
        .param("provider", 0)
        .`when`()
        .get("/api/auth/check")
        .then()
		    .statusCode(200)
        .body("result.exists", equalTo(false))
}
추가적인 옵션
[요청 응답값 확인]
log(). all()을 given과 then에 추가하면 요청과 응답값을 확인할 수 있어 확인하기 편리하다.
따라서 추가하는 것을 추천한다.
import io.restassured.RestAssured
import org.hamcrest.Matchers.equalTo

@Test
fun `존재하는 유저`() {
    RestAssured
        .given().log().all()
        .header("Authorization", "Bearer thisistoken")
        .param("provider", 0)
        .`when`()
        .get("/api/auth/check")
        .then().log().all()
        .body("result.exists", equalTo(false))
}

마무리
가장 기초적인 정보들만 정리해 보았다. 추가적인 옵션이나 방법에 대해서는 공식 문서를 참고하면 좋을 것 같다!
참고
https://github.com/rest-assured/rest-assured/wiki/Usage
Usage
Java DSL for easy testing of REST services. Contribute to rest-assured/rest-assured development by creating an account on GitHub.
github.com
https://loopstudy.tistory.com/427
'개발 스토리' 카테고리의 다른 글
| sh 실행 시 문법 오류 해결법 (0) | 2025.03.09 |
|---|---|
| Redis를 사용한다면 Session 대신 JWT를 사용할 필요가 있을까? (0) | 2025.03.06 |
| 환경 변수 관리에 대한 고민 및 submoudule 적용(pre-push 활용) (0) | 2025.03.04 |
| 토큰을 헤더로 줘야할까 파라미터로 줘야할까? (0) | 2025.03.01 |
| [코프링 걸음마] 코프링에서 필요한 플러그인 (0) | 2025.02.10 |
- Total
- Today
- Yesterday
- Assertions
- 코루틴
- 토스 합격 후기
- redis
- 우테코 6기
- 우테코 프리코스
- 토스 NEXT 후기
- 우아한테크코스 자소서
- 6기
- 우아한테크코스
- 레디스
- Cache Stampede
- 토스 백앤드 합격
- stoplight
- 우테코 준비
- 우아한테크코스 6기
- 우테코
- 토스 2025 NEXT
- API 지연
- 토큰
- 게임개발
- 알고리즘
- 파이썬
- 커넥션 데드락
- 분산락
- 자바
- JWT
- 우아한테크코스 후기
- 토스 next 2025
- 캐시 스템피드
| 일 | 월 | 화 | 수 | 목 | 금 | 토 |
|---|---|---|---|---|---|---|
| 1 | 2 | 3 | 4 | 5 | 6 | |
| 7 | 8 | 9 | 10 | 11 | 12 | 13 |
| 14 | 15 | 16 | 17 | 18 | 19 | 20 |
| 21 | 22 | 23 | 24 | 25 | 26 | 27 |
| 28 | 29 | 30 | 31 |